Reverse Engineering is one of the most interesting fields in cybersecurity and ethical hacking. Through this post we will try to simplify this field by going through the ideas involved in a step by step manner. We’ll be focussing on simple ELF Linux executables for now and later on we will also investigate reverse engineering windows exe executables and bytecode for JVM etc. So let’s get started!
What is Reverse Engineering?
In simple terms Reverse Engineering refers to the process of deconstructing any engineered object to figure out the internal mechanisms. One example would be cracking games where crackers have to reverse engineer the game code on their PC in order to be able to distribute it for free.
Most software that is not open source does not provide it’s source code and instead we have the compiled executable code with us. We have to in a way figure out what the soruce was (or a subset of it) from the executable code. This in general is not easy to do so because machine/assembly code is far complex and also has a lot of compiler optimisations added to it.
In general the executable provided to us may not be binary or assembly instructions it could also be in the form of platform independent byte code that any virtual machine (say the Java virtual machine) executes. We will however look at only Linux executables generated from C/C++ code in this tutorial as that provides a pretty great overview of the field. To do so however we must understand basic assembly.
Introduction to x86 Assembly
x86 Assembly is the assembly instruction code used by the non ARM (Intel/AMD) processors and most CTF problems will use this instruction code. The instructions generated may vary from OS to OS and we will consider linux executables (ELF format). Also before proceeding note that there a variety of different assembly syntaxes, we will be using Intel Assembly syntax in this tutorial although the alternative AT&T syntax is also quite common.
Assembly language has very few constructs compared to higher level languages, instead having to rely on some primitive operations. Most assembly operations happen with respect to registers, which are special memory locations on the CPU which is way faster than directly accessing RAM and a lot of special values are stored here. We will first go through these registers and their naming conventions:
Registers
A register can be thought of as a special memory location in the CPU. There are 6 general purpose registers and 2 special registers available. We can do all possible assembly operations on these registers like adding values, subtracting etc.
The 8 registers are named as EAX, EBX, ECX, EDX, ESI, EDI, ESP, EBP.
However if you go through any assembly code you will see various variations in the register names. There are different ways in which you can call different registers.
The above naming provides you access to the 32 bits associated with every register. Nowadays in 64 bit systems each register is allocated 64 bits which can be called by using the names RAX, RBX, RCX, RDX, RSI, RDI, RSP, RBP.
Similarly if you want only 16 bits you will call them as AX, BX, CX.. and so on. To get eight bits you will use AL, BL, CL.. and so on. The following diagram explains this better:

For more details on registers go through this link The general purpose registers can be used for computation and infact it is only through these registers that you can do operations like addition subtraction. So if you want to say add two numbers stored at two different memory locations you would have to load the values stored there into the registers and then operate and then write these values again into the memory location. We will not be going into specifics of these operations instead we will quickly summarise them below.
One more important thing to note is that ESP and EBP are used to store the memory location of the stack. ESP points to the top of the stack and EBP (generally) refers to the bottom. Declaring variables on the stack would therefore be equivalent to adding and subtracting values from ESP and EBP. Note that you generally don’t need to know the exact specifics but having a vague idea works.
There are also a couple of FLAGS that are used by assembly. Think of a flag as a specific boolean variable which is set by assembly instructions. Some flags are the zero flag, the sign flag etc. We will mostly be needing the zero flag in reverse engineering since this flag is used many times to determine control flow.
Basic Assembly Operations
mov operation
The mov operation is one of the simplest operations and all it does is moves values (or assigns values). The syntax of mov is the following:
mov destination, sourceSuppose I want to set the value 12 in EAX then I would run the operation:
mov eax, 12One more thing to understand is dereferencing. This is similar to C. Suppose the register ECX holds the value 0x6665f which is a memory location. ECX is therfore similar to a pointer. If I want to load the value stored at 0x6665f into EAX I will use the following command:
mov eax, [ecx]The brackets [] functions similar to * in C/C++ and it dereferences the memory location and outputs the value at that location.
add operation
This is pretty simple. Consider the following assembly code:
add eax, ebxThis is equivalent to:
eax = eax + ebxsub operation
This is similar as well. Consider the following assembly code:
sub eax, ebxThis is equivalent to:
eax = eax - ebxcmp operation
This is a very useful operation and is used for comparing values. The result of this operation can be combined with jump operations to dictate control flow. Consider the following code:
cmp ecx, 15h
jz 0x7eb
Let’s see what this does. The cmp command compares the values given to it, in this case it is the value stored in ecx and the value 21 given as hexadecimal. cmp essentially subtracts these two values and sets some FLAGS which we talked about before. Here if both the values are equal then the subtraction will be 0 and so the ZERO flag will be set.
The next instruction jz stands for “jump if zero”. Thus if the zero flag is set the program jumps to the code location charactersised by 0x7eb address (this is easily seen by using a debugger). Thus this is similar to an “if” statement.
Turns out we can use such commands clever to construct for, while and other loops. We will go through this in the next article. Instead of using jz if we used jle the jump would have happened if ecx <= 15h was satisfied. Indeed a variety of such conditionals can be used to simulate control flow.
push and pop
These are not really that important for us. The syntax is mostly of the form:
push/pop registerThis operation is responsible for pushing/poping values onto the stack. We will not be using this much.
test operation
This is similar to cmp except it computes the binary AND instead of subtracting.
Thus if the binary AND of the two inputs given is 0 then the zero flag is set.
The following C conditional can thus be easily translated into assembly:
if (eax == 0){
	// do stuff
}
The corresponding assembly will be:
test eax, eax
jz location_to_do_stuff
lea operation.
This is the final operation that we will see here. This is similar to mov but instead of copying the value it copies the address.
lea eax, [ecx]The above code will copy the value stored in ecx (that is, the address) into eax. Observe that mov would have copied the value stored in the address stored in ecx. Thus lea loads the address instead of the value. It stands for load effective address.
Introduction to Static Disassembly for Reverse Engineering.
A lot of theory was seen so far. Let us now see how we could put it all into practice!
We would need a disassembler to get and investigate the assembly code. Let us use a static disassembler for now. A static disassembler does not allow us to run the file but it provides a neat disassembled analysis of the assembly code. IDA is the industry standard for this and download and run the free version of IDA from here
Once you have installed IDA Free, you can start working and analysing the code. Let us solve this CTFLearn challenge using IDA.
Download the file and load it into IDA. Keep on clicking next, do not change any options (let IDA decide that it is an ELF for instance!). You should arrive at the following screen:
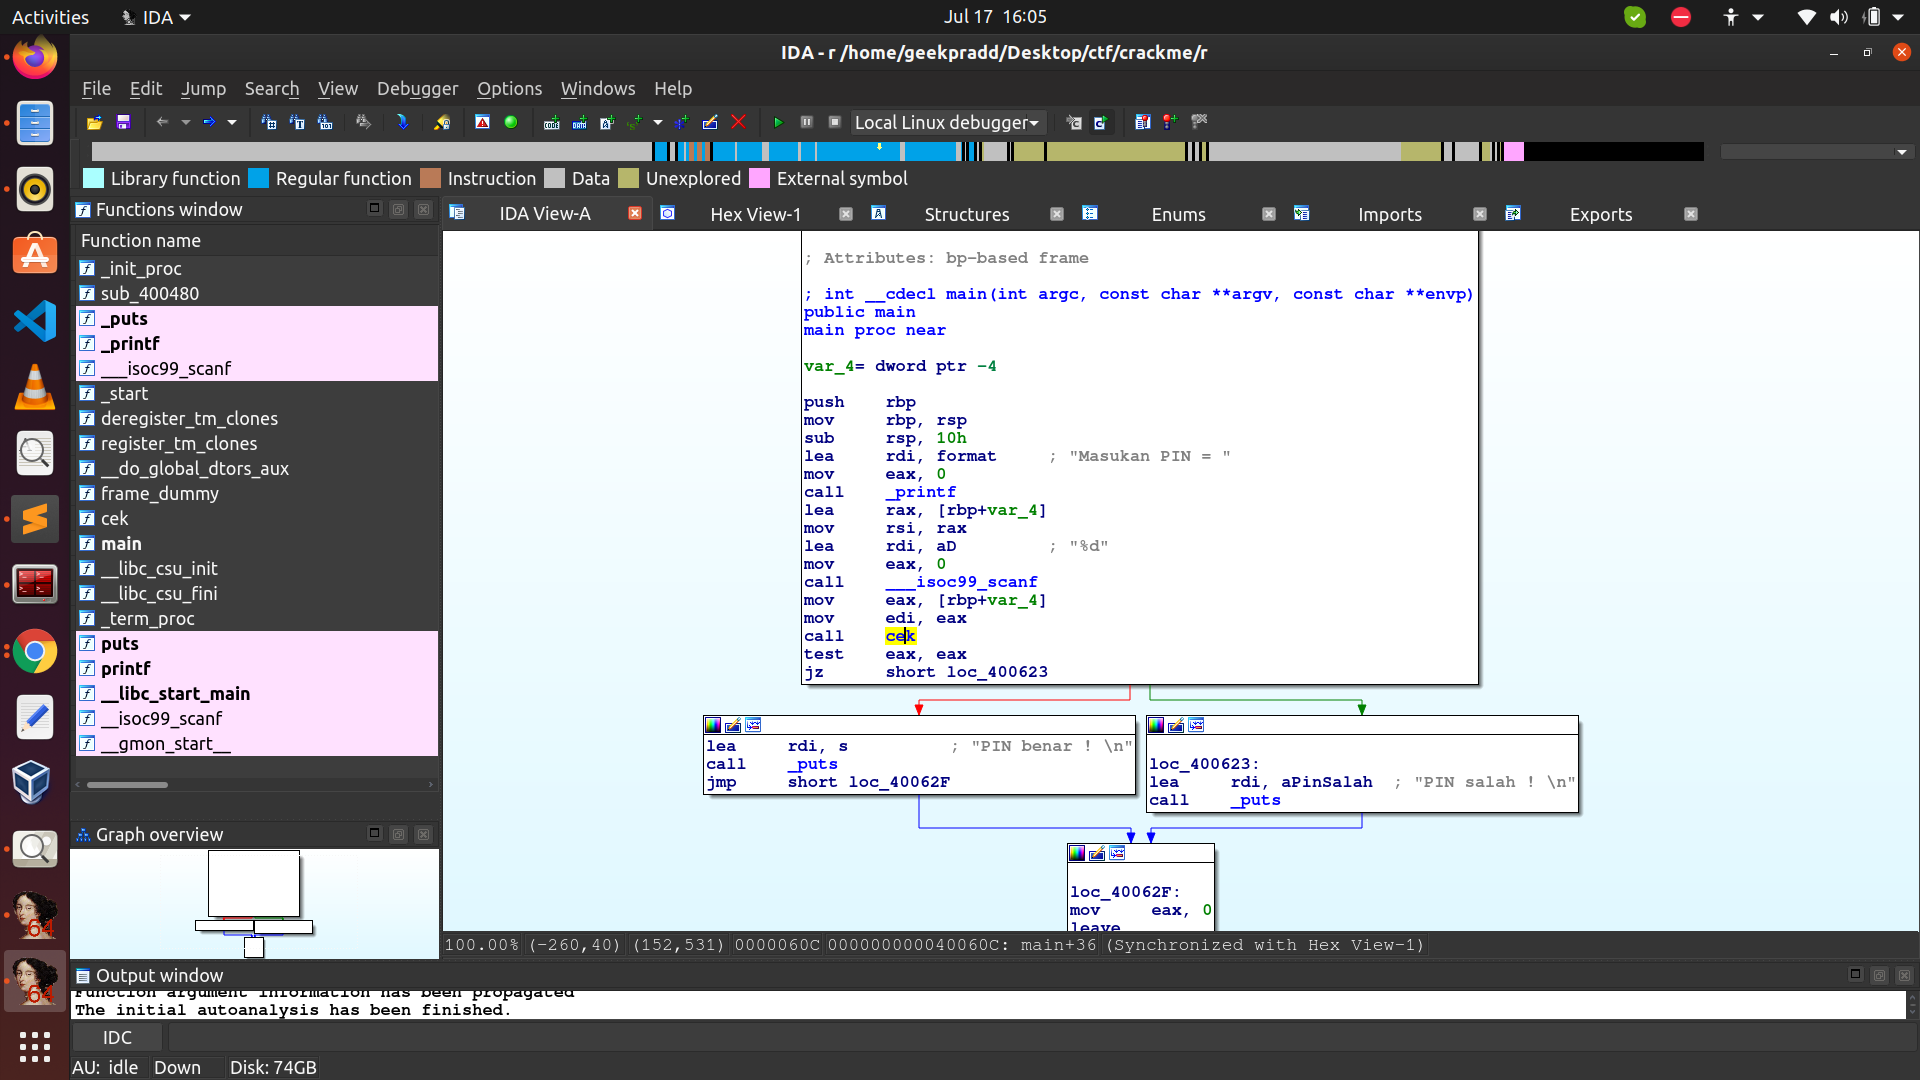
If you run the file you observe that you need to enter a pin for this to work. If you enter any random input it will output “PIN Salah!” Clearly we want to find the PIN which gives the other possibility.
The above branches show the other possibility, you want to get “PIN benar!”. Observe that via test the only way we can get “PIN Salah!” is if EAX held the value 0.
So somehow when we enter the wrong PIN EAX is set to 0. Observe that there is an instruction called call cek. call in assembly means that we are calling a function. Double click there to see what the code for the cek function is:
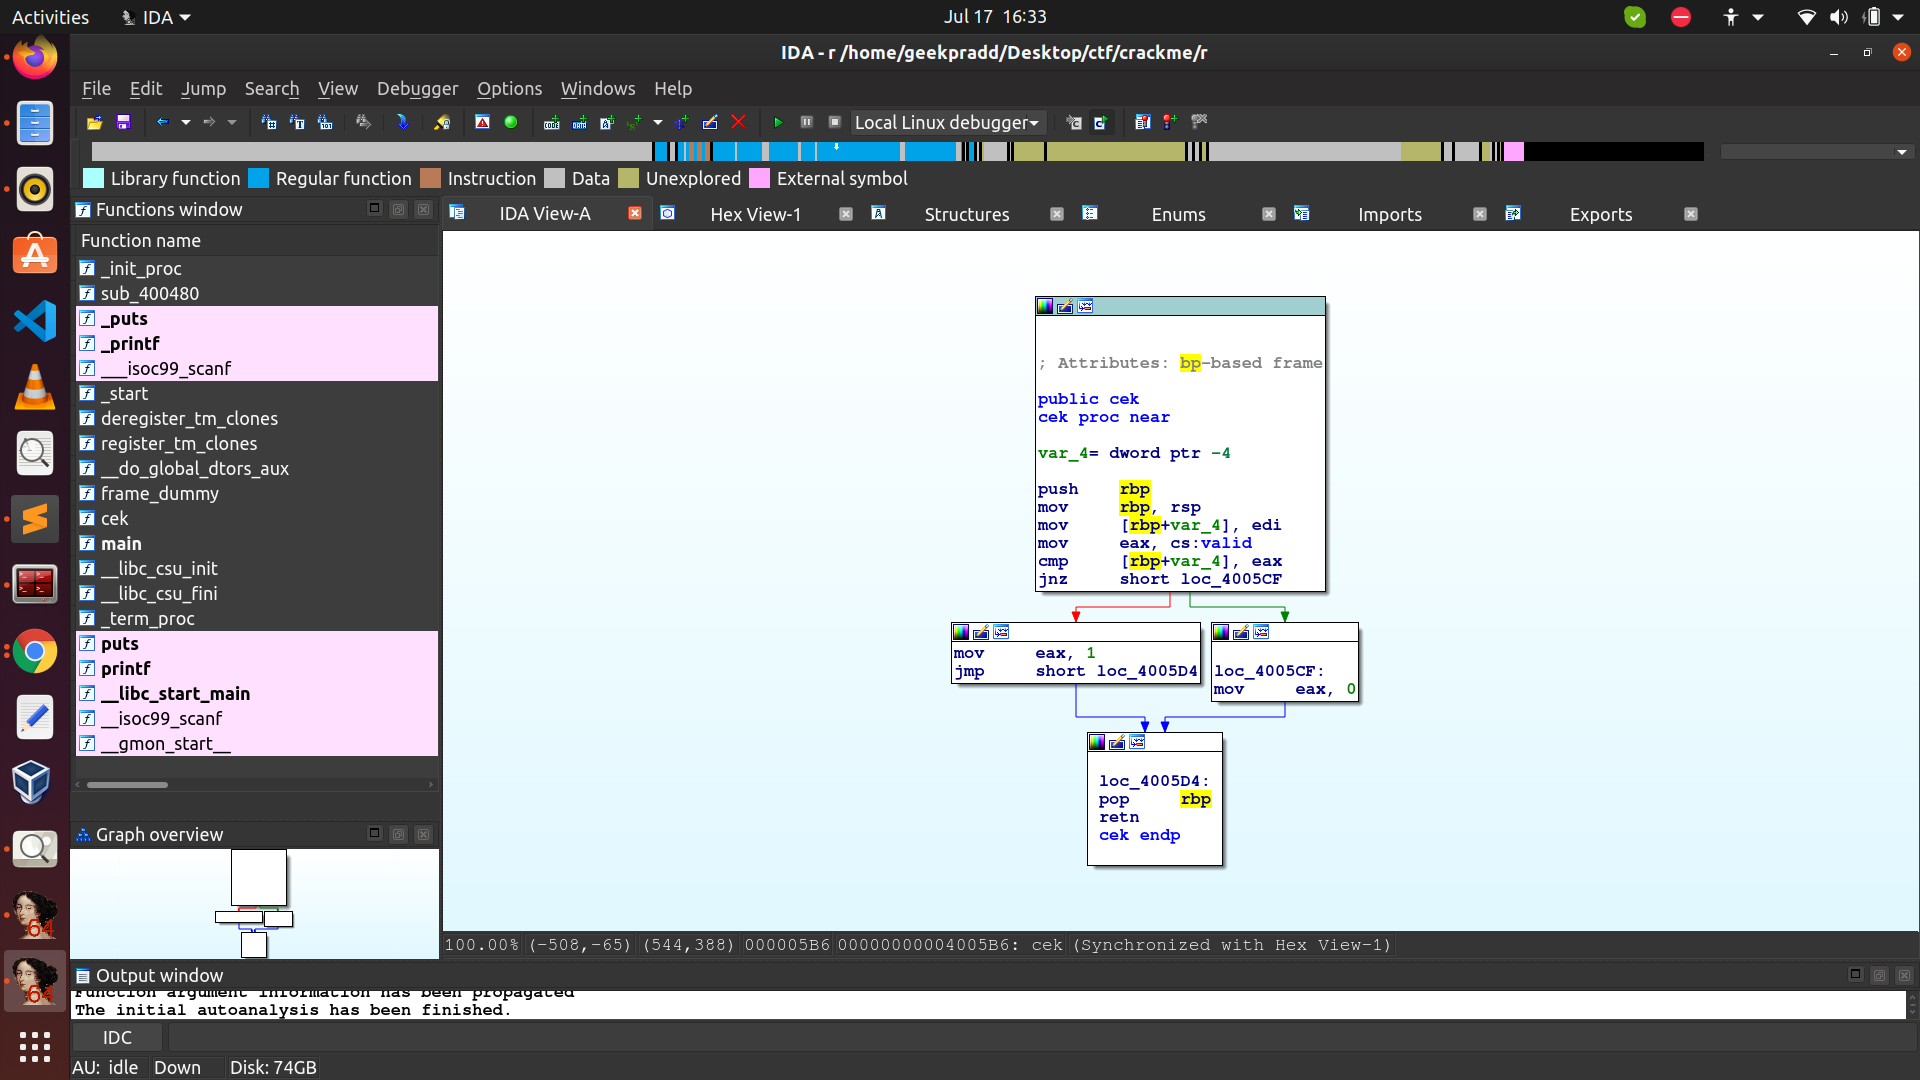
One important thing to note is that in reverse engineering never try to analyse everything since a lot of it is generated via the compiler and could be hard to make sense of. Instead try to gain an insight into the structure of how the program is operating.
Now we see that well after everything that happens in the upper block in cek there are two routes. One route sets eax to 1 and else to 0. Clearly we want to see when the value is set to 1 as only then the pin is correct.
The branching is decided by jnz. This means “jump if not zero”. And as we are using cmp this means that only when the zero flag is set we won’t jump (and hence get EAX as 1).
When is the zero flag set? This happens only when [rbp+var_4] == eax. However the above two movs show that the value now in [rbp+var_4] is the same as the value in edi and that in eax was in something called cs:valid.
What is this cs:valid? Turns out it’s just a name given by IDA to some value stored in the binary. If we double click this we get the following value data:
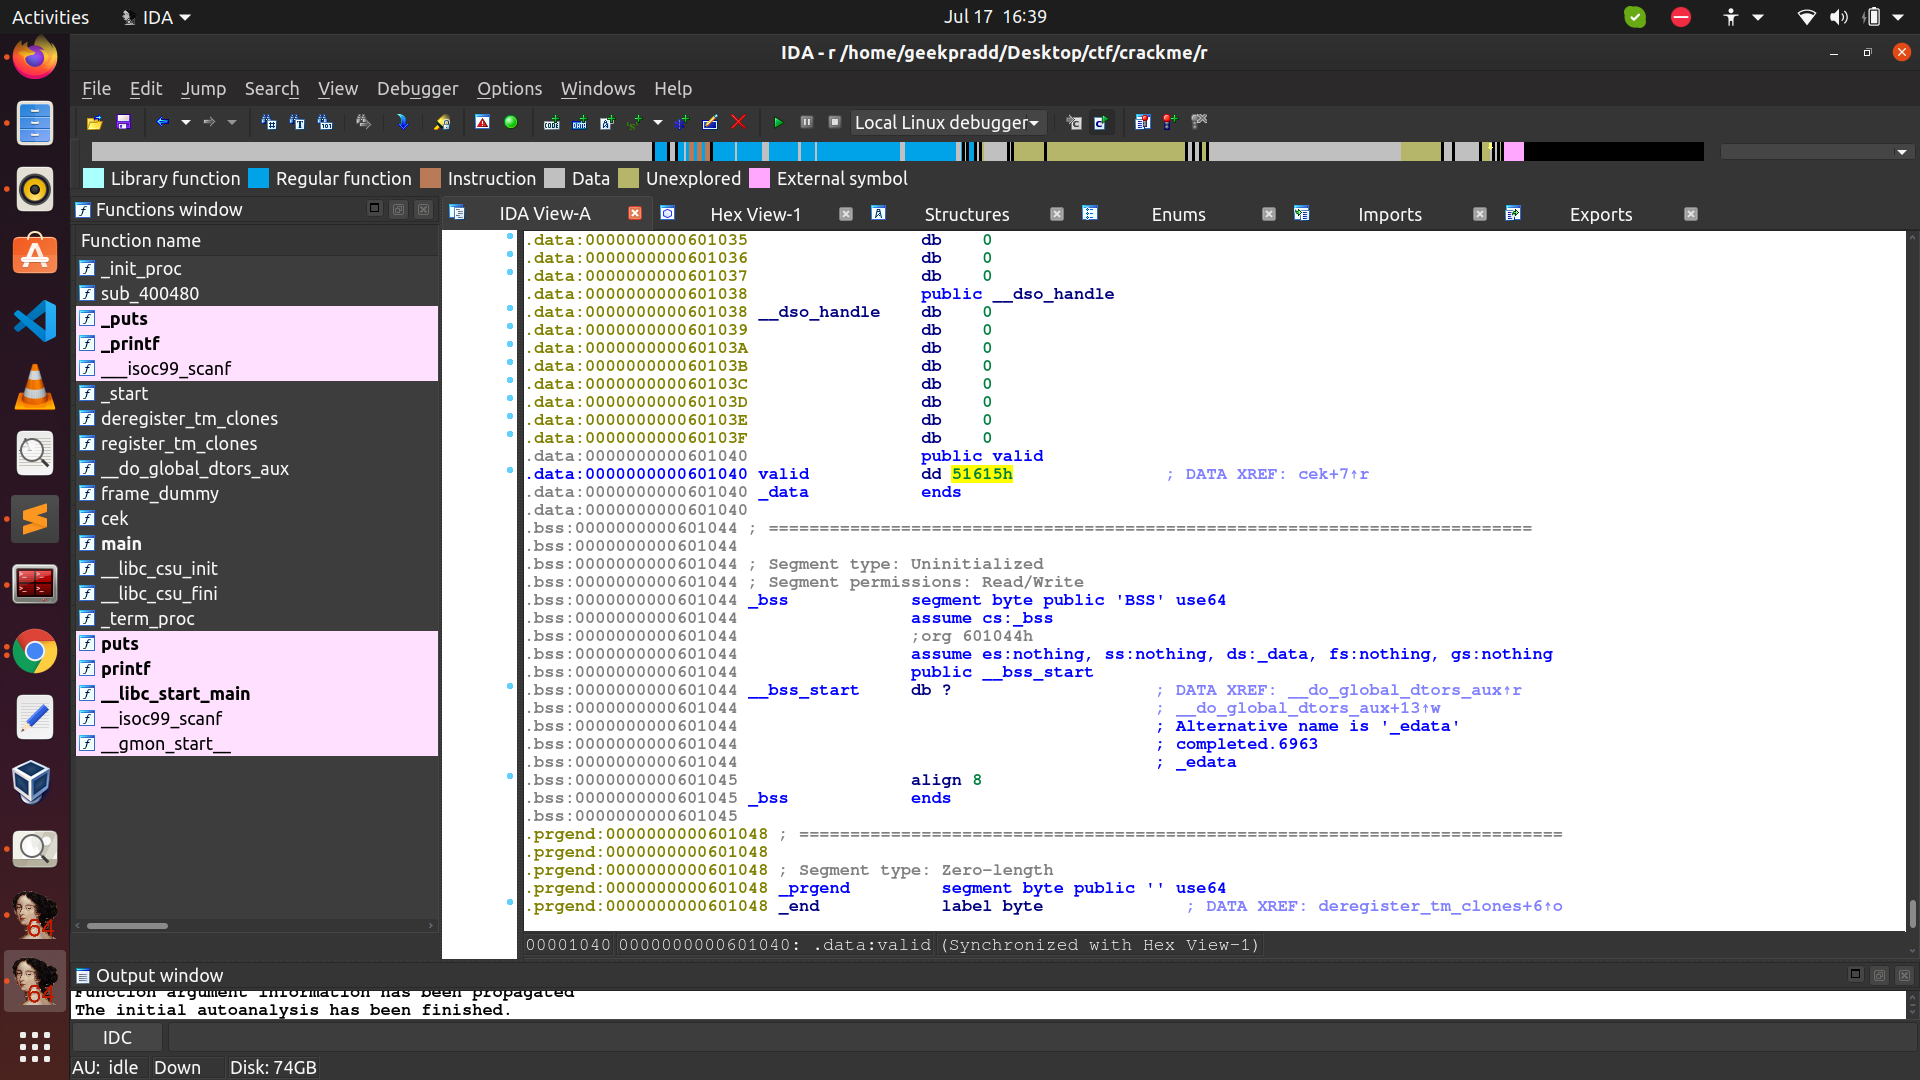
Now we haven’t seen where our input is getting stored. Turns out it is getting stored in EDI. This in general changes but using something called a dynamic disassembler (gdb) we can figure this out (we’ll see this in the next tutorial). Even without knowing this we could guess that well the input is stored in EDI and as we will see this guess turns out to be right.
So if our input is equal to the value 51615h (which is given in hex) we will get 1 in EAX and hence that has to be the PIN! Converting this to binary we get 333333 as this value.
Let us input this and see what wheter this is correct or not.
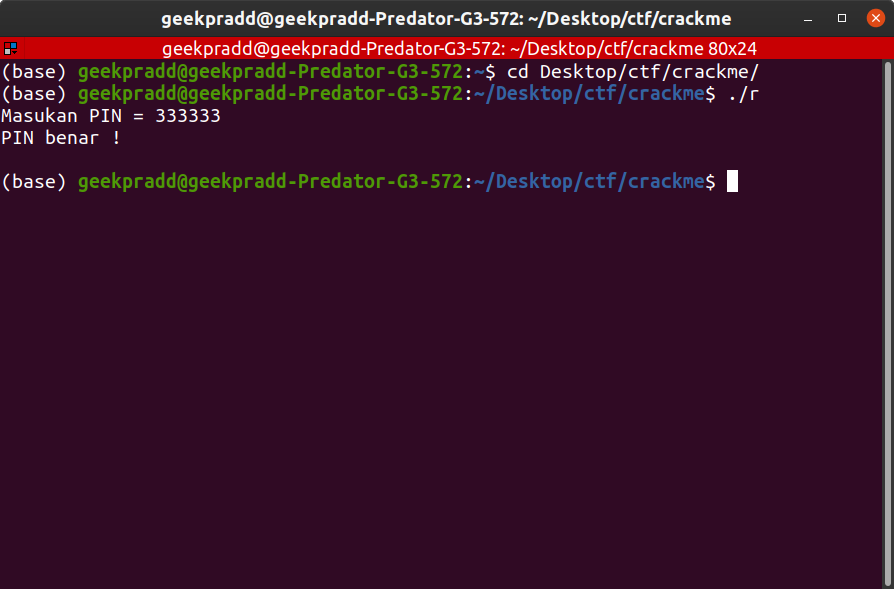
And indeed we get “PIN benar!” This is the PIN and we found the PIN using some clever disassembly and investigative skills!
This sums up this problem. This was actually one of the simpler reverse engineering problems since we could solve it using only a static disassembler. Later on we will see some more complex problems that have to be solved using other tools like gdb, radare2 etc.
This is the end of this tutorial. Feel free to try out more problems using IDA and also remember to google a lot. Understanding assembly isn’t easy and one has to frequently google to figure out what each operation is doing. That’s it have fun and keep hacking!